


HamGeek 5th/6th Generation CapDMA Video Overlay Box + CaP75T DMA Board + KMBOX NET Keyboard Mouse Box Controller Kit
Não foi possível carregar a disponibilidade de retirada.
5th Generation Blue CapDMA Video Overlay Box HDMI-Compatible for 2K144/1K240:
Interfaces (Please follow the instructions to connect the HDMI-compatible cable in order):
- HDMI-compatible output: to connect the main display
- HDMI-compatible 1 host: to connect the host GPU
- HDMI-compatible 2 secondary: to connect the secondary machine GPU
- Type-C: to upgrade program and inject EDID (only used during upgrades)
- DC 12V: power supply (default 12V 2A)
- Note: the host GPU cannot be directly connected to the main monitor with a DP or HDMI-compatible cable. If there is a connection, it must be unplugged.
Indicators:
- D1: Power indicator (always on for power on)
- D2: Fusion function on/off indicator light
- H2: HDMI-compatible 2 secondary machine input signal indicator (always on: normal; off: no signal)
- H1: HDMI-compatible 1 host input signal indicator (always on: normal; off: no signal)
Button Function:
- Power: power switch
- K1: short press for switching resolution in cycle (1920 x 1080; 2560 x 1440; 3840 x 2460; 2560 x 1080; 3440 x 1440)
- Note: long press and hold the K1 key for 3 seconds (hold until displayed): the current resolution and refresh rate are displayed in the upper left corner of the screen, with the host information on the top and the secondary information on the bottom.
- K2: short press for switching the upper layer image matting intensity with a total of 21 levels from 0 to 20. (default 0, level 0 also matting)
- K3: short press to restore the upper layer cutout strength to the factory default of 0.
- K4: Short press for switching the fusion function.
- Note: If you press the K4 key and the fusion light on, but there are no perspective fusion, there are two ways to solve this problem. One is to set the background color of the secondary unit to pure black; The second is to press the K2 key to enhance the RGB value.
Other Functions:
- Plug and play, automatic standby, memory storage, temperature controlled cooling, original picture output, extremely low latency.
Following the above wiring method and video tutorial, it still cannot solve the compatibility problem of the monitor, then it requires an upgrade. It requires adding an EDID. As following:
First Step: Read the monitor EDID
- Method: Connect the GPU of the computer host to the main monitor using an HDMI-compatible2.0 or HDMI-compatible2.1 cable (very important: it is the output of the GPU, directly connected to the main display without going through the DMA video overlay box). On the computer host, select the most suitable GPU output resolution and refresh rate (such as 2560x1440 at 144 , 1920x1080 at 240, etc.) to enable the monitor to display normally. Then install the MonitorAssetManager with the file name of mi_setup.exe. After installing, run the Monlnfo.exe and wait for it to open.
After opening, select the first one:
Select File, click Save as...:
Choose the saving path, click SAVE to read the EDI Bin file:
Second Step: inject EDID to the DMA video overlay box
After saving the Bin file, insert the Type-C cable into the Type-C port of the DMA video overlay box, and connect the other end of the USB to the computer where the Bin file was just saved. (At this point, restore the normal wiring of the DMA video overlay box, that is, connect the HDMI-compatible output cable of the computer host GPU to the box, and connect the box output cable to the main monitor.) Power it on, and then turn on the box.
Next, open the [Injector tool]:
After opening, select the serial port number (if the serial port number is not correct, it will point out fail), select the correct injection location in the parameter injection (according to the resolution of the main monitor, which is the resolution set above, it is very important to choose the correct resolution), select the injection method as [Load Parameter File], select the parameter file (the saved Bin file read before), and finally click [Injection Parameters] to wait for injection. During the injection process, a black screen will appear for a while, and after completion, there will be a prompt indicating successful injection. After successful injection, unplug the Type-C cable and keep the output of the box connected to the HDMI-compatible cable to the main display.
Precaution:
- Using the previously set refresh rate for the host and secondary computers, right-click on the desktop to open 'Display Settings', check if the resolution is correct, drag to the bottom to open 'Advanced Display Settings', select the monitor (the model is the one you just injected), and set the refresh rate below to the optimal refresh rate for your monitor.
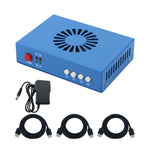
Package Included (Blue CapDMA):
- 1 x HamGeek Blue CapDMA
- 1 x Power Adapter
- 3 x USB Cables
Package Included (Blue CapDMA + CaP75T DMA + KMBOX NET):
- 1 x HamGeek Blue CapDMA
- 1 x Cap75T DMA Board
- 1 x KMBOX NET
- 1 x Power Adapter
- 4 x Black USB Cables
- 2 x Blue USB Cables
- 1 x Bracket
Note:
- The color of the real product is not the same as the product displayed in the picture.
---------------------------------------------------------------------------------------------------------------------------------
Silver CapDMA 6th Generation Mini CapDMA Video Overlay Box HDMI-compatible for 2K144/1K240:
Interfaces (Please follow the instructions to connect the HDMI-compatible cable in order):
- HDMI-compatible output: to connect the main display
- HDMI-compatible 1 host: to connect the host GPU
- HDMI-compatible 2 secondary: to connect the secondary machine GPU
- Type-C: to upgrade program and inject EDID (only used during upgrades)
- DC 12V: power supply (default 12V 2A)
- Note: the host GPU cannot be directly connected to the main monitor with a DP or HDMI-compatible cable. If there is a connection, it must be unplugged.
Indicators:
- D1: Power indicator (always on for power on)
- D2: Fusion function on/off indicator light
- H2: HDMI-compatible 2 secondary machine input signal indicator (always on: normal; off: no signal)
- H1: HDMI-compatible 1 host input signal indicator (always on: normal; off: no signal)
Button Functions:
- Power: power switch
- K1: short press for switching resolution in cycle (1920 x 1080; 2560 x 1440; 3840 x 2460; 2560 x 1080; 3440 x 1440)
- Note: long press and hold the K1 key for 3 seconds (hold until displayed): the current resolution and refresh rate are displayed in the upper left corner of the screen, with the host information on the top and the secondary information on the bottom.
- K2: short press for switching the upper layer image matting intensity with a total of 21 levels from 0 to 20. (default 0, level 0 also matting)
- K3: short press to restore the upper layer cutout strength to the factory default of 0.
- K4: Short press for switching the fusion function.
- Note: If you press the K4 key and the fusion light on, but there are no perspective fusion, there are two ways to solve this problem. One is to set the background color of the secondary unit to pure black; The second is to press the K2 key to enhance the RGB value.
Other Functions:
- Plug and play, automatic standby, memory storage, temperature controlled cooling, original picture output, extremely low latency.
Following the above wiring method and video tutorial, it still cannot solve the compatibility problem of the monitor, then it requires an upgrade. It requires adding an EDID. As following:
First Step: Read the monitor EDID
- Method: Connect the GPU of the computer host to the main monitor using an HDMI-compatible2.0 or HDMI-compatible2.1 cable (very important: it is the output of the GPU, directly connected to the main display without going through the DMA video overlay box). On the computer host, select the most suitable GPU output resolution and refresh rate (such as 2560x1440 at 144 , 1920x1080 at 240, etc.) to enable the monitor to display normally. Then install the MonitorAssetManager with the file name of mi_setup.exe. After installing, run the Monlnfo.exe and wait for it to open.
After opening, select the first one:
Select File, click Save as...:
Choose the saving path, click SAVE to read the EDI Bin file:
Second Step: inject EDID to the DMA video overlay box
After saving the Bin file, insert the Type-C cable into the Type-C port of the DMA video overlay box, and connect the other end of the USB to the computer where the Bin file was just saved. (At this point, restore the normal wiring of the DMA video overlay box, that is, connect the HDMI-compatible output cable of the computer host GPU to the box, and connect the box output cable to the main monitor.) Power it on, and then turn on the box.
Next, open the [Injector tool]:
After opening, select the serial port number (if the serial port number is not correct, it will point out fail), select the correct injection location in the parameter injection (according to the resolution of the main monitor, which is the resolution set above, it is very important to choose the correct resolution), select the injection method as [Load Parameter File], select the parameter file (the saved Bin file read before), and finally click [Injection Parameters] to wait for injection. During the injection process, a black screen will appear for a while, and after completion, there will be a prompt indicating successful injection. After successful injection, unplug the Type-C cable and keep the output of the box connected to the HDMI-compatible cable to the main display.
Precaution:
- Using the previously set refresh rate for the host and secondary computers, right-click on the desktop to open 'Display Settings', check if the resolution is correct, drag to the bottom to open 'Advanced Display Settings', select the monitor (the model is the one you just injected), and set the refresh rate below to the optimal refresh rate for your monitor.
Package Included (Silver CapDMA):
- 1 x HamGeek Silver CapDMA
- 1 x Power Adapter
- 3 x USB Cables
Package Included (Silver CapDMA + CaP75T DMA + KMBOX NET):
- 1 x HamGeek Silver CapDMA
- 1 x Cap75T DMA Board
- 1 x KMBOX NET
- 1 x Power Adapter
- 6 x USB Cables
- 1 x Heat Sink
- 2 x Screws
- 1 x Bracket
Note:
- The color of the real product is not the same as the product displayed in the picture.
We accept the following forms of payment:
Credit Card (Visa, MasterCard, American Express, JCB)
PayPal
Bank Transfer (Please contact us Hamgeek@163.com for details)
Delivery and Shipping Fee
Shipping Services & Shipping Fee
Orders will be shipped by 4PX(10-20days Delivery time),if you need ship by Express shipping etc. DHL,FeDex,UPS,Please pay extra fee . Due to air transportation restrictions, package only contains battery is not accept by shipping company.
If your order does not qualify for free shipping,our service department will contact you for shipping fee details within 2 days after order placed.
Shipping Notice
For special shipping requests, please contact service department by email (HamGeek@163.com) or whatsapp. Please confirm your address before payment. If you enter the wrong address, please contact us in a timely manner. We will contact logistics personnel to solve the problem. If you ask to change the address after the order has been shipped, we cannot guarantee that your order will be updated. In addition, you are responsible for all possible risks and expenses caused by changing the address after the order has been shipped.
When you place an order, be sure to enter the correct name, address, and contact information so that we can deliver your items successfully.If you need order to be shipped by Express or the package weight is over 2kg that only can be sent by Express shipping,Please offer VAT number before order processed.
Delivery Time
Total delivery time is composed of two parts: processing time and actual shipping time.
Processing time refers to the time from when your payment is received to when we collect and pack your order. Our processing takes 1-2 working days normally. The second part is the actual shipping time. This is the time that it takes for the package to be delivered by the couriers to the major destination. All goods will be shipping via air mail.
Please make sure the Zip code and city name is correct( corresponding), otherwise the order processing will be delayed untill correct information provided.
In order to process your order quickly, we strongly recommend you to use the same address for your shipping address and billing address. Otherwise, your order will bedelayed for further verification.
Tariff or Customs Duties
All listings's price not included the tariff or customs duties as this part of fee various in different countries,if you have any requirments of decleration value, please contact us before order processed.